Saturday, August 30, 2014

Slowly getting back at it.

It's been awhile since I have posted. Mostly because I have been working on finishing other projects before I can go full speed at this one. Since then I have been doing a lot of thinking and planning on how I am going to do everything from the body to the interior, as well as the things you don't see like the wiring and underbody.

I have rethought out how I am going to mount the engine as well as what engine I am going to use. I am still going to use a VQ series engine but I decided to go with a 350z VQ35 instead. Various reasons were taken into consideration in doing this from power goals to interior.

Interior you ask? Well I don't want this car to look like a Datsun on the outside but feel like a Miata inside. I feel like that would take away from the idea and goal I set out to achieve in the first place. So I decided I would do a Miata NA/NB/NC and a 350z mash up on the interior. Which means I will wire the car to make it think it's a 350z. Doing this will allow me to use 350z gauges, Nissan anti theft system and as well as some other perks I will get into along with being able to use the newer software modern Nissan ECUs have to offer.

So where do we start? Well I plan on using a electronic assist power steering column. This will get rid of hydraulic power steering under the hood. So I sourced one from a Versa. So I bought one from the junkyard with the ignition switch, keys and door lock. 


I also bought the every wiring harness from a 350z. 

Doing this will allow me to make the car think it's a 350z. This takes out having to make my own circuits, as well as allows me to use nissan anti theft system and it will allow me to have more control over the entire car via can bus system, not to mention it should make running a VQ35DE engine in the car a breeze.

So to start I need to make all the keys match for all of the locks in the car. If you notice most modern cars all have their locks built into their handles where as the roadster in 67 had the old style setup where the lock was below the door handle. I plan on using the old style roadster push button door handles to stay consistent with the old school look of the car. So with those door handles I will be using the old style lock. 

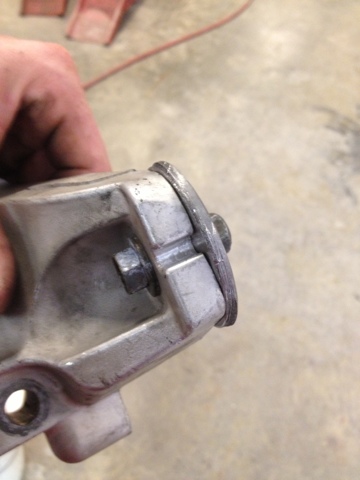
The thing is old style datsun locks are nothing like modern nissan keys. To be able to utilize nissan anti theft system I need to be able to use the modern keys for various reasons. So I set out to find a lock that looked like the old Datsun lock but used modern nissan type keys and functioned like a 350z lock. The answer to this was a 99 Pathfinder rear tailgate lock. It was surface mounted on its own like a datsun lock, accepted modern nissan keys and functioned like a 350z lock.

As you can see there is a sensor that detects swipe direction (lock/unlock) which is what we need. This type of sensor is also on the 350z lock shown here:

 So what we need to do now is rekey the Pathfinder lock to accept the key I purchased with the versa key set. This is a fairly simple task and sounds more complicated than it really is.

First we need to remove the swipe direction sensor:

Now remove the clip on the back that holds the metal arm on it, and remove the tension spring, take a picture of the tension spring before removal or just take very good mental notes on how it is installed on the lock for reassembly:

Now with some pliers remove the chrome face. You will damage it so don't worry about that. Remove and discard it.


Now remove the cylinder, it should slide right out, be careful to not let the wafers in the cylinder fall out as it is important the order of these stay as they are (my wafers are not in the cylinder in this picture as I already removed them for the next step) :

Next step, we are going to remove all the wafers. Since I took apart the Pathfinder lock in this picture and it will be re-keyed to the Versa key I do not have to worry about the order of the wafers currently in the pathfinder lock. To remove the wafers just take a needle nose pliers and pull them out one by one:

As you are pulling them out you will see tiny springs under the wafers be careful not to loose them and pull them out as well.


Now we want to repeat the process with the versa lock, but when we pull the wafers out we want to make sure we write down the number code. You can find the numbers on the wafers themselves, if you zoom in on this wafer you will see a number 4. The wafers have a number from 1-4:

Reinstall the wafers from the versa lock cylinder back into the pathfinder lock cylinder, make sure you have a spring installed under each wafer. Once you have done so, check your order by inserting the key you are rekeying the lock for into the cylinder. Each wafer should slide down in the cylinder flush with the cylinder's body:

Reinstall cylinder back into the lock body and at this point when you remove the key the wafers should spring up and not allow you to turn the cylinder without the key. Once you have tested everything and it functions like it should reinstall the spring, the metal arm and the clip. Last but not least take the lock to a local lock smith and have them install a new face as it will be cheaper than buying the tools and parts to do it yourself. 

Now re install the swipe sensor and we are ready to install it on the car and test for functionality. 

Once the wiring of the doors is complete the rest is pretty much a breeze.


Saturday, September 14, 2013

Removing the rear of the donor.

Today I cut the rear body panels out of the roadster. In doing this I am glad I decided to go the Miata/roadster mash up route as I found more hidden rust and rot during the cutting out of the body panels. Luckily the sections I need are rust and rot free, but it appears this car had a lot of short cuts made on the body work by using alot of bondo and newspaper as fillers. Needless to say to all of you out there not to thrilled with the idea of cutting up a roadster for a project such as this, I believe that if a roadster had to be donated this was as good of candidate as any. After some strategic cuts with the cut off wheel here is what I was left with:


It will be awhile before I start the process of fitting this to the Miata. I just wanted the roadster out of my 1 car garage at my house and I didnt want it to be in the way at the shop. So storing the car out back of the shop was the best option. I wanted to avoid the body sitting out in the weather so I went ahead and cut the last of the body panels I needed off the roadster before I set the car outback and let Mother Nature have her way with it.


According to my measurements the Miata in the rear is roughly 7" wider than the roadster. No worries, the same method applied to the front will be utilized in the rear, cut and add metal.

In the shop awaiting fitment:

Wednesday, September 4, 2013

Transmission in!

I finally got the transmission in place it was a tight fit but everything landed where I intended. 


As you can see the oil pan sits pretty low past the k member I was thinking of modding the oil pan or perhaps elongating the k member, but now I'm leaning more towards a skid plate rather than throwing off the geometry of the suspension by doing essentially the same thing, protecting the oil pan. Ill have to see how low the car squats with the weight of the engine and trans on it.

In the car I had to trim the shifter hole slightly to clear for my mock up shifter bracket. This shifter bracket is temporary as I plan to fabricate a better one. 


Test fitted with the NB center console I have with it fitted with a embroidered Nismo shift boot.

Yeah I need to get a better shift knob.

Next I need to fabricate the transmission mount.

Friday, August 30, 2013

Mounting the beast

I got the motor pretty well set in place where I needed it now was time to level it off. I needed a flat spot on the motor to get it properly leveled. I used the lower intake manifold of the 350z as a place to rest my torpedo level for reference. I set a block of wood between where the k member goes under the engine for clearance as well as clearance of the steering rack. After a few attempts to get the engine to sit level freely I realized I was going to need something to temporarily hold the engine level and in place to weld up the motor mount brackets needed. I realized I had just the thing to do the trick. You might laugh but it did the trick. We had a whole bag of long zip ties normally used commercially for holding HVAC duct work to diffusers in the ceiling. It ended up being perfect for what I used them for, a temporary place holder for the engine. So I centered  the motor in the engine bay, leveled it off from front to back and side to side. I zip tied it in place in conjunction with using the engine hoist to keep it supported.


Motor now set, I was surprised to see the motor mount bracket mounting point on the block was in line with the k member. This is a good sign because I won't have to make a custom k member and it means the motor is near center on the k member for weight distribution. I found that I could drill the holes for the mount and have it offset enough to clear the steering rack like so:


It doesn't look like the 350z manifolds will clear my mount bracket so they will be removed for now. Hopefully the Nismo Frontier headers will clear if not ill just fabricate ones that will.

So now to make the first basic parts of the brackets, the mount plate to the engine and the mount plate to the motor mount itself. 

The plates to the engine are simple trace and cut out, then test fit to engine.


Then looking at the mount I found that that plate can be a perfect circle. I got out my hole saws and found one roughly the size of the mount.


Cut out the plate:

Being that hole saws use a pilot bit to hold them in place, it drills a small hole dead center of the plate which works out perfect for my needs. The pilot hole was two small so I just drilled it out bigger to suit the mount.


Perfect fit except there is a alignment dowel as I call it that won't allow the plate to sit flat unless it is also drilled into the plate.


So I took a nut and bolt and held the mount plate in place on the stock 350z mount arms.


Found a drill bit about the same size as the hole needed to be drilled. Drilled it.


Result:

Test fitted:

Like a glove! With all my mount plates fabricated and ready to go its time to make the mount arms needed. I bolted the engine to mount bracket plates to the engine and then bolted the mount bracket plates to motor mount plates to the motor mounts. Using card board and tape I made templates for the arms needed. I then traced them on the metal and cut them out. Once cut out I tack welded them in place.

I noticed that my drivers side mount is slightly under the body of the Miata. I am all about ease of maintenance so I am going to position the passenger side mount in a little closer to the engine for clearance and ease of engine removal if I ever have to pull it back out.  

So I placed the passenger side mount in place all the while being careful not to obstruct the starter.  I then did the same thing I did for the drivers side mount bracket, made a template and tack welded the arms in place. I cut loose the zip ties and rechecked my torpedo level.


Still level!

Pulled the motor out. Pulled the brackets off. Welded them solid. Sand blasted them in preps for powder coating later.

Drivers side:

Passenger side:

I will be putting the car on my lift next and bolting the transmission to the engine in preparation for making the transmission mount. 


Thursday, August 22, 2013

Stuffing the engine in...

As I mentioned I am using a VQ30DET for this build. I actually have a few variants of the VQ series engines in my possession. I have a VQ30DE from a Maxima and a damaged VQ35DE from a G35x (350z engine). So with the various engines I am able to mix and match parts from the different engines to "Frankenstein" a VQ engine together to suit my needs. For fitment purposes I will be using the damaged VQ35. 

The VQ30DET uses motor mounts that are the same as a R32 Skyline. I have Nismo R32 mounts with 350z motor mount brackets I am hoping will work for my application. I also have a set of stock 350z manifolds to use as I am certain I will most likely have to do a rear mount turbo setup. 

After pulling the motor and reading various other Miata builds it became clear that I would have to convert my VQ to rear sump for clearance of the stock Miata K frame. Luckily there is a solution to this small problem. 

Nissan used the VQ series engine in the 2001-2004 Pathfinder which utilized a rear sump. So I bought the upper and lower oil pan off a Pathfinder and went to work.


I also ordered a new oil pick up tube, oil baffle, oil dip stick tube, oil dip stick and various gaskets new from Nissan. 

I popped the upper and lower oil pan off the VQ30DET. First thing I did was test fit the new Pathfinder oil pick up tube. 


Next thing I did was test fit the Pathfinder oil baffle. I found that the bolt holes needed to bolt down the oil baffle were missing on the VQ30DET torque plate (I think that's the name for it)


Thinking I was going to have to order a new plate from Nissan, I decided to pop open my damaged VQ35DE to see what it's plate looked like. I was surprised to find bolt holes where I needed them on its plate.


So I laid the oil baffle on it and found it lined up perfectly. 


Happy that I didn't have to purchase more parts I took everything and test fitted them on the VQ30DET. Everything went on without a hitch.


Then lastly I fitted the upper and lower oil pan, they too went on without a hitch. Only thing I will have to do is tap and plug the factory dip stick location on the VQ30DET and drill the block in the exact same location for the dip stick as the pathfinder block.


Now that I know everything fits the VQ30DET. I removed the upper and lower oil pan, as well as the motor mounts and brackets. I installed them on my damaged VQ35DE motor as well as the 350z headers and G35 transmission.


Ready for test fit!

Well first thing first I had to notch the subframe as you can see by this picture the oil pan is off center.


The oil cooler was also removed as it interfered with the steering rack. 

Transmission had to be removed as the engine could not be angled enough to clear the steering rack with the transmission attached.

The stock 350z manifolds were cut as they were too long and hit the fire wall. They will be replaced with shorter VQ40DE Nismo headers for a 05-13 Pathfinder/Frontier


I then found that the 350z motor mount brackets are not going to work for my needs. I will still use the Nismo Skyline motor mounts but the brackets I will have to custom make myself, no worries. After some measuring here is how the motor will sit:


The motor sits a little high and will surely have hood clearance issues. I plan to remedy this by elongating the stock Datsun Roadster hood scoop, which should give the roadster a more aggressive look.

The motor sitting at its lowest results in the oil pan sitting a inch or so past the bottom of the K member. This obviously won't work. Once the motor is mounted I will remove the upper oil pan and cut out a section of it reducing the length to be even or just barely past the K member and weld the pan back together.